Overview
- Required webpage setup
Creating the Google Tag for your website
Conversions
- Creating a confirm page (Conversion Event)
- Redirect to conversion event page setup
- This redirect must be set up in the Eveve tms
- Creating a Google ads conversion
- Conversion Tag Setup
- Create the link between the conversion page and the main page
- Conversion web page tag/script
- Testing
The document covers the full google ads conversion tracking system.
The whole conversion tracking chain looks as follows:
-
User search some terms on Google that lead to showing your Sponsored Ad.
-
When the Ad is shown, Google registers it as an Impression.
-
Clicking on the Ad is registered by Google as a Click-through or a Lead.
-
When a user completes any of Conversion Goals, the conversion is registered as complete.
-
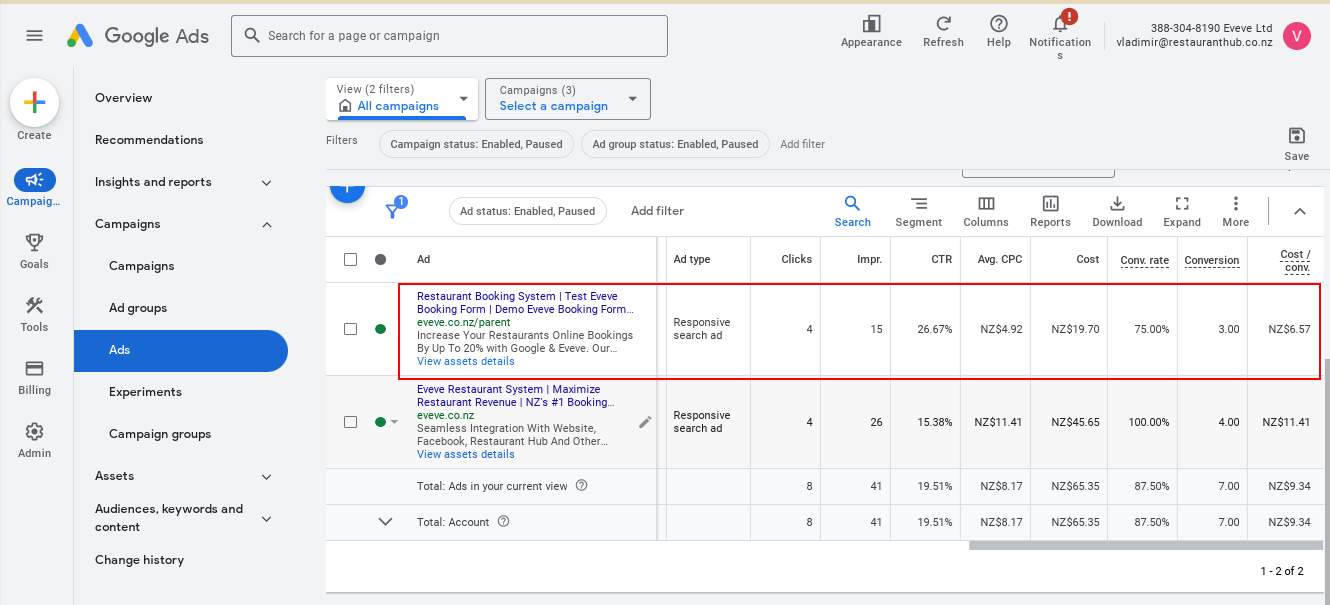
All this data - Impressions, Click-throughs and Conversions will be shown on Google Ads portal in specific reports.
Required webpage setup:
-
Placing the google tag on your website (this normally goes on every page)
-
Create a basic page to use as a conversion page. This page must only contain a confirm message for the user who is booking and the conversion tag/script. No header or footer as this will display as a success message only (sample https://www.eveve.co.nz/confirm.html)
-
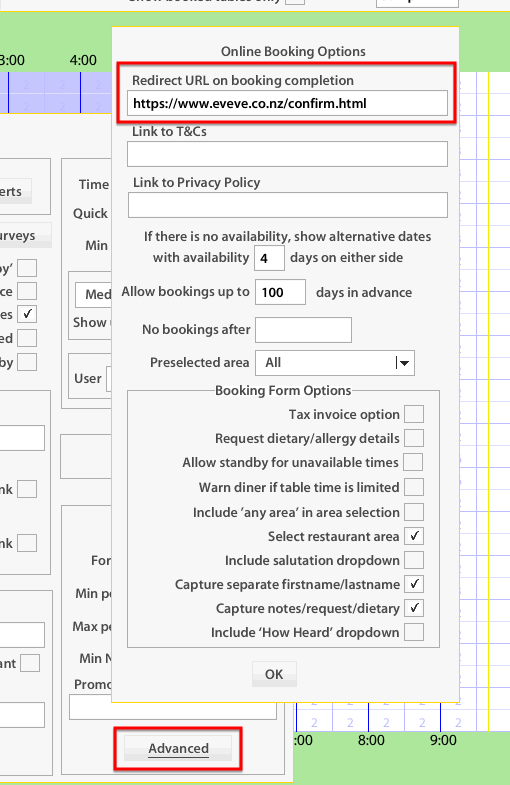
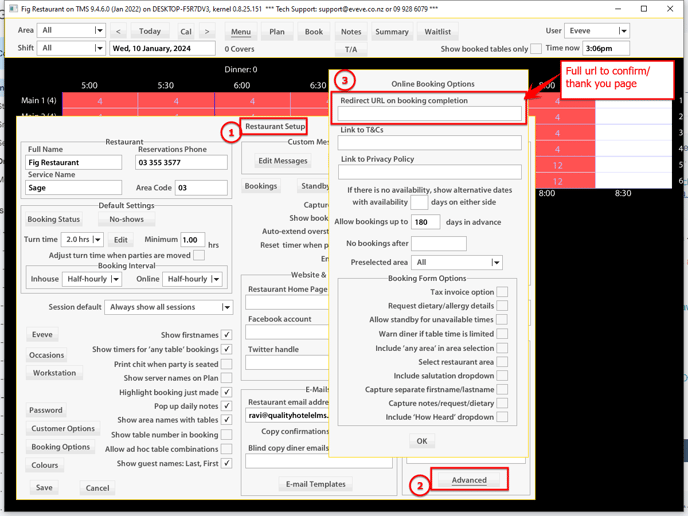
Setting the Eveve system to redirect to your conversion page on successful booking - TMS → Setup → Advanced → ‘Redirect URL on booking completion’
Creating the Google Tag for your website
First thing, we need to configure the Google Tag for your website.
If you don’t have a Tag yet, follow Google’s instructions on how to do it:
https://support.google.com/google-ads/answer/2476688?hl=en
When the Google Tag is created you can check it and proceed to install it on your Website.
Sign in to your Google Ads account and go to Tools → Google Tag
There you can see your Tag and a link to Installation instructions:
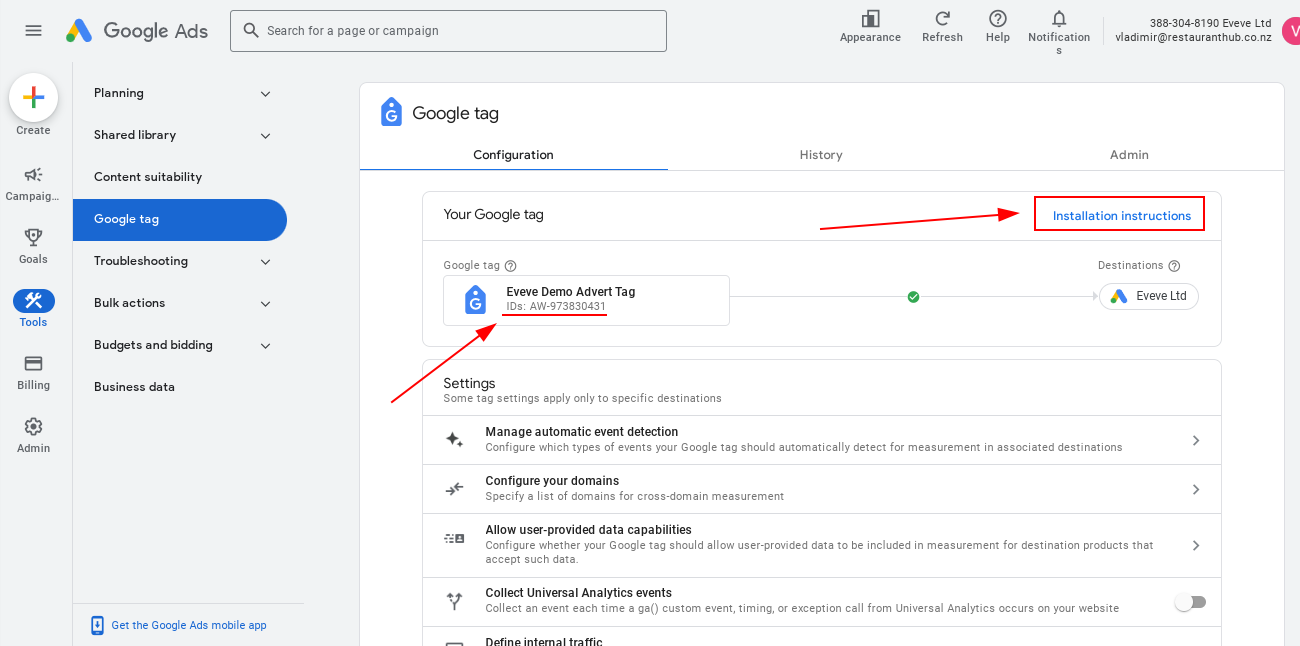
Click on Installation instructions and choose the way you want to install the Google Tag:
- Install with website builder or CMS
- Install manually
In our example we choose manual installation, so we COPY the code snippet
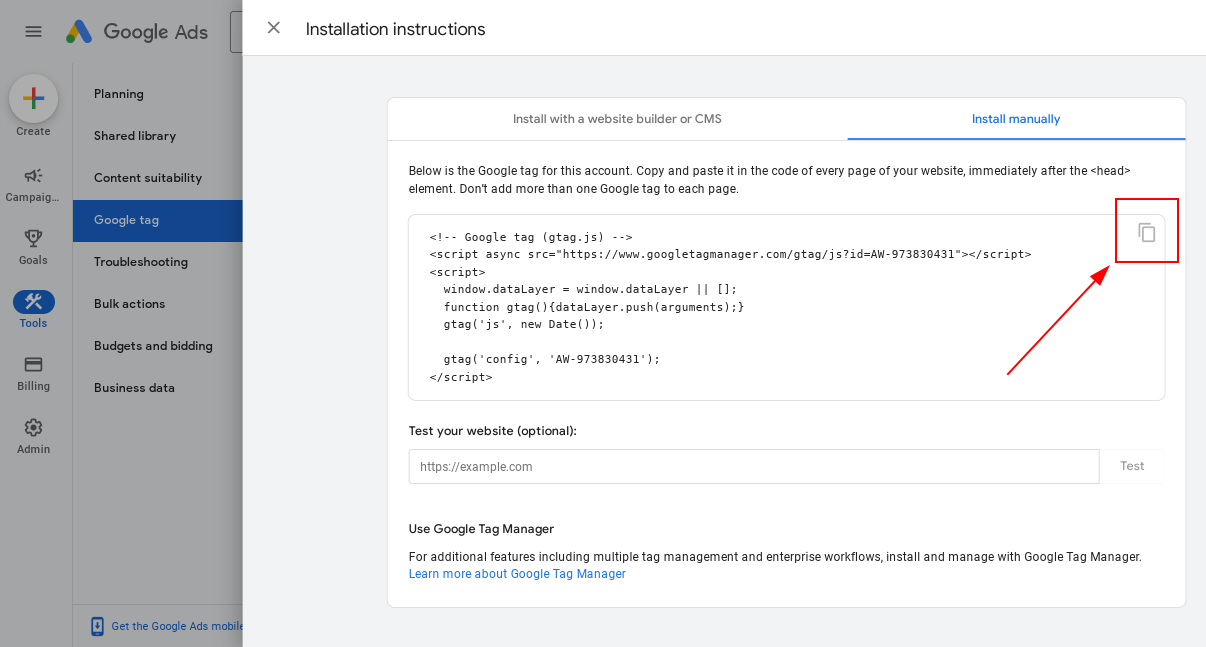
The code snippet must be placed in the <head> section of your website.
This code must be present on every page you wish to track.
In our example, we have only 3 pages:
https://www.eveve.co.nz/parent.html
Main page where user sees the booking form, which is being loaded into an iframe from Eveve’s servers. This page contains and iframe and loads the next url wit the form
https://nz4.eveve.com/tms/DateCovers.php?Est=DemoNZ
This is the eveve booking form within the iframe, this will not need modification.
https://www.eveve.co.nz/confirm.html
Eveve will redirect and load the content of this page (on your own domain name) when a successful booking is made.
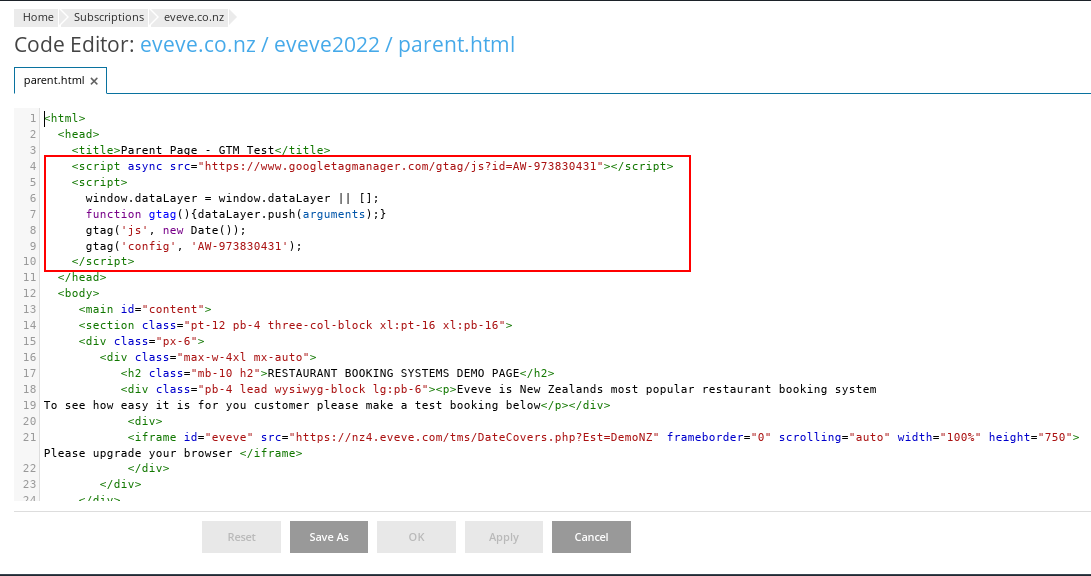
Adding the google tag to your website
We add the google ads, google tag code snippet to parent.html (your website all pages you wish to track)
When the Google Tag is installed on your website, make sure it works - fill in the url where the tag is available and click Test:

Now this Google Tag can be used to track page views etc for your main website.
Conversions
In our example, a conversion event must be triggered when a user submits the booking form and the custom confirmation page /confirm.html is loaded into the iframe on /parent.html
Creating a confirm page (Conversion Event)
A confirm page needs to be created to display within the booking iframe after the final stage of booking; this will replace the default Eveve confirm booking page. This page should contain the code snippet and the basic confirmation text to display on success of a booking. No header or footer or navigation sample https://www.eveve.co.nz/confirm.html
This page will also need the script inserted within the head that will activate the conversion on the parent page from within the iframe (see section ‘Conversion Tag Setup’)
Redirect to conversion event page setup
This redirect must be set up in the Eveve tms.
This redirect must be set up in the Eveve tms
Open the TMS on your computer/laptop, navigate to Setup (choose Restaurant Setup), click on Advanced, and the Booking Options window will appear. Fill in the "Redirect URL on Booking" field with the URL of the confirm/thank you page.
Creating a Google ads conversion
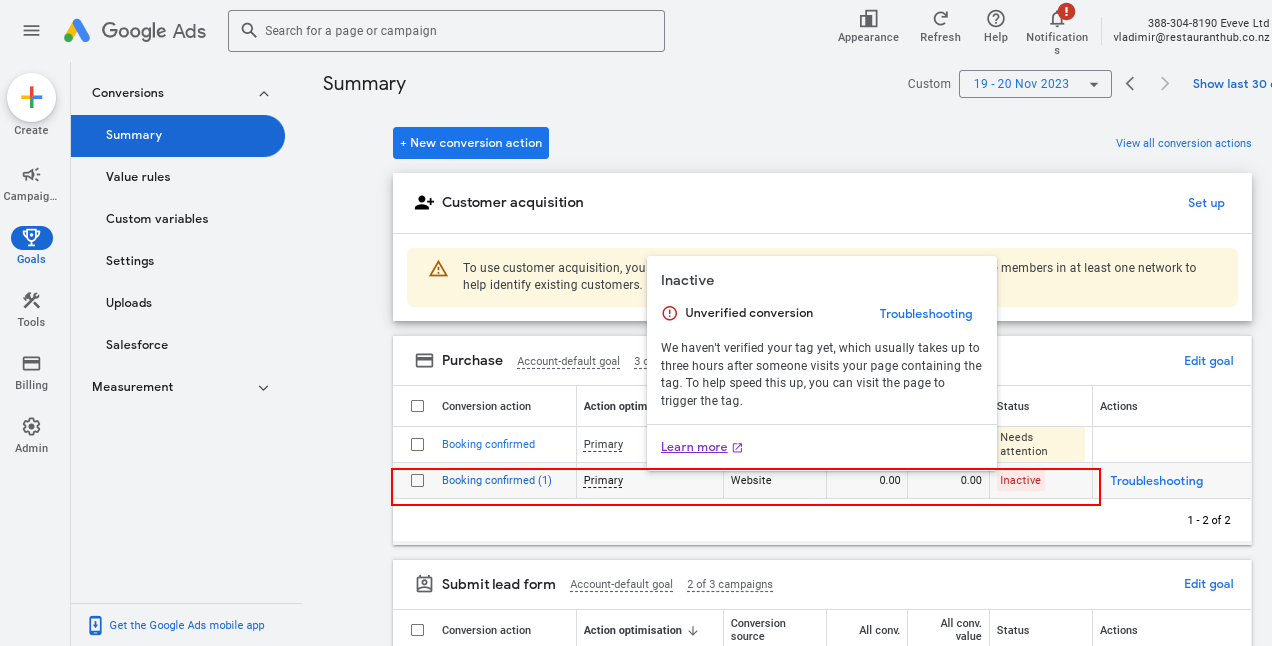
In Google Ads go to Goals → Conversions → Summary
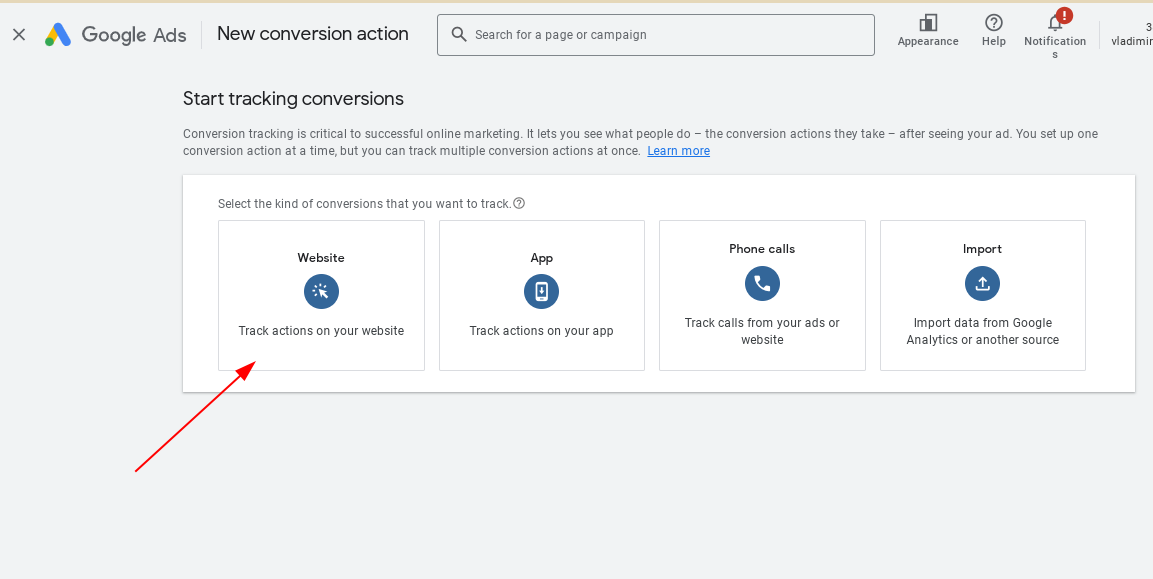
And click the button: New conversion action

Select ‘Website’ as the type of Conversion action:
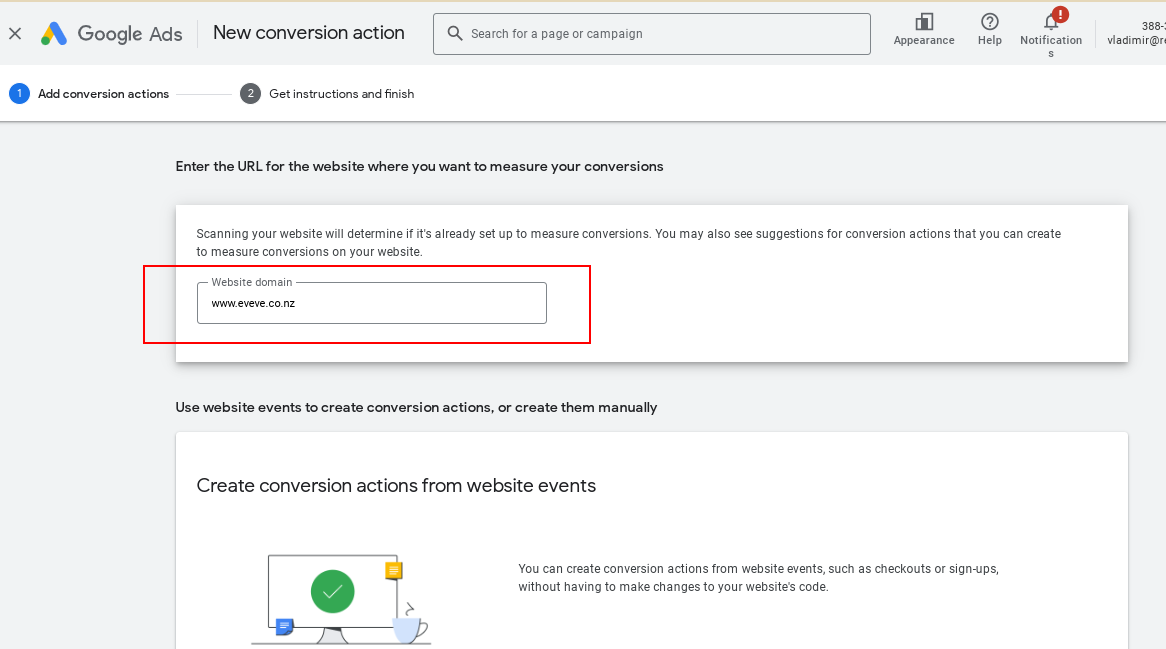
Enter the domain name of your website:
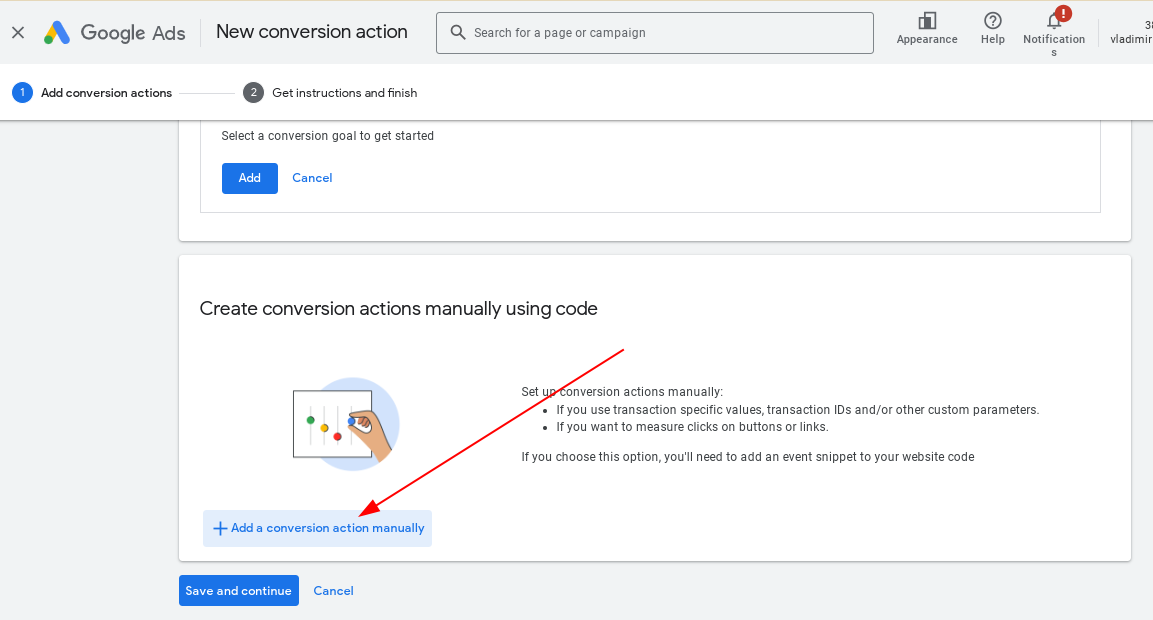
Then scroll down and click ‘Add a conversion action manually’:
Select ‘Purchase’ as the goal of conversion:

When the Conversion action is created it will be marked as Inactive. That’s ok for now, we will get back to that later and activate.
Conversion Tag Setup
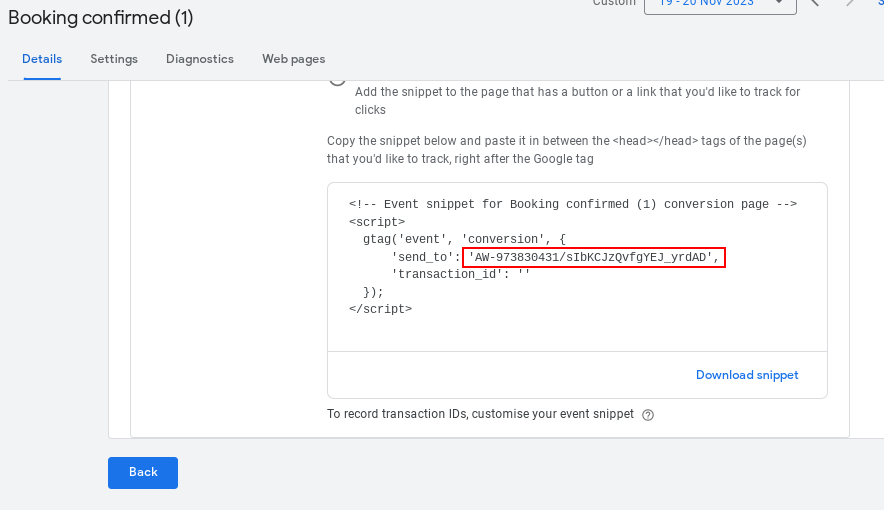
Now click on it and scroll down to Tag setup for the conversion:
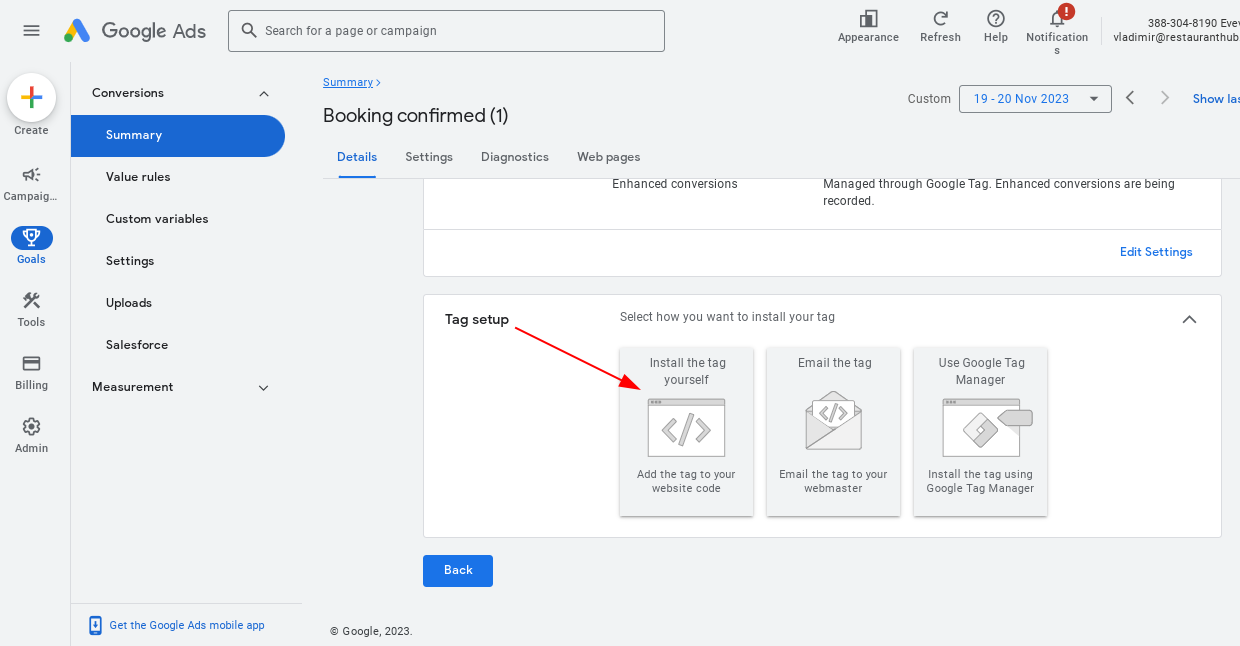
Choose ‘Install the tag yourself’, scroll down and you will see the code snippet for triggering the conversion event.
We won’t use it as is. We will need to modify it first, so copy and save it somewhere for later.
Create the link between the conversion page and the main page
Important notice:
The url where the conversion event is triggered is www.eveve.co.nz/confirm.html but the conversion is sent to the parent page (parent.html) page
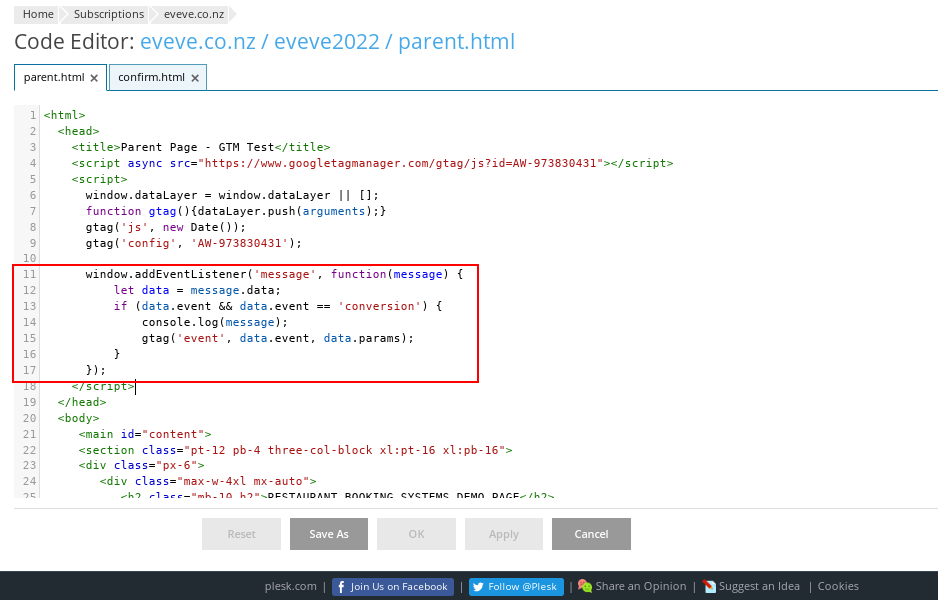
The confirm.html page is loading into an iframe, it doesn’t actually trigger the conversion event. Instead, it only sends a signal to the parent window, a message, that the conversion event has been completed. The parent window must receive that message and trigger the conversion event. To do so, we need to add some code to our parent page source code. Add this code right after the Google Tag code that was created before as shown below:
window.addEventListener('message', function(message) {

  let data = message.data;

  if (data.event && data.event == 'conversion') {

    console.log(message);

    gtag('event', data.event, data.params);

  }

});
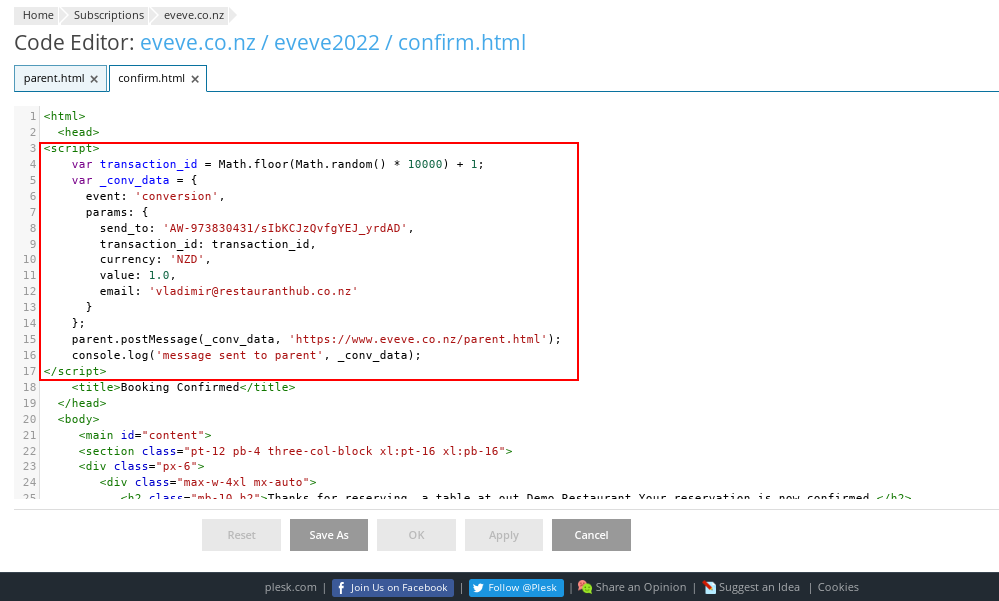
Conversion web page tag/script
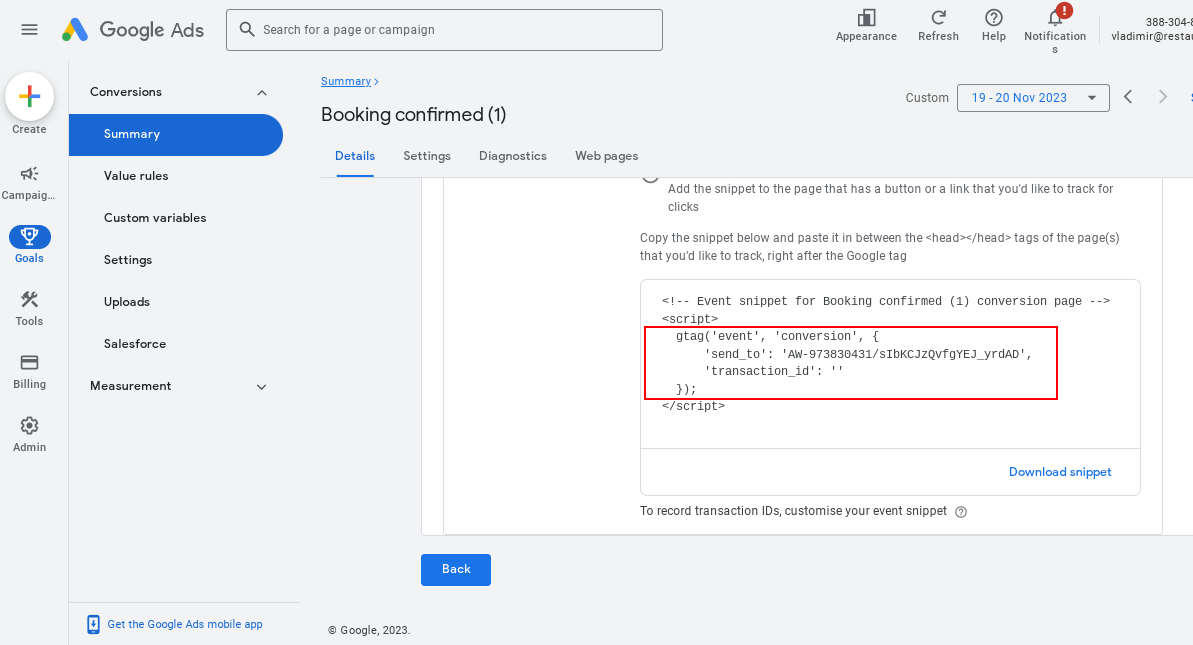
On the confirmation page we need the following code template (you will need to modify it):
<script>

var transaction_id = Math.floor(Math.random() * 10000) + 1;

var _conv_data = {

  event: 'conversion',

  params: {

send_to: 'AW-973830431/sIbKCJzQvfgYEJ_yrdAD',

transaction_id: transaction_id,

currency: 'NZD',

value: 1.0,

email: 'vladimir@restauranthub.co.nz'

  }

};

parent.postMessage(_conv_data, 'https://www.eveve.co.nz/parent.html');

console.log('message sent to parent', _conv_data);

</script>
What is happening here is we create an object containing conversion data that we want to send to our parent window (/parent.html). And the parent window must fire the conversion event using that data.
First, you need to modify this line:
parent.postMessage(_conv_data, 'https://www.eveve.co.nz/parent.html');
Replace the second argument (italics) with the url of your parent page/reservation page.
Then, you need to replace the value of send_to parameter to the one you got earlier after creating the Conversion action. It’s a combination of ConversionID/ConversionLabel.
This is the only parameter you need to send to start counting conversions, all other parameters are optional and can be removed.
The value of transaction_id in our example is just a random number from 1 to 10000, which ‘represents’ a booking unique id.
You can replace it with your value if needed or remove it. Normally, it should be a unique identifier of your conversion event, e.g. booking id. It is not necessary and only helps to avoid duplicate conversion counts for the same bookings if, for some reason, the conversion event is triggered more than once with the same parameters.
Two parameters - currency and value represent the value of each conversion, you can change them according to your needs or remove them. In our example we use the same value for each new booking.
The email parameter represents user email and is not required. Here it’s only for example.
More about Enhanced Conversions here:
https://support.google.com/google-ads/answer/13258081?hl=en
Testing
Now you can check if everything is set up correctly by making a new test booking.
For easier debugging it is recommended to use specialised browser extensions.
In this example we use Analytics/GTM/Pixel Debugger.
https://chromewebstore.google.com/detail/analyticsgtmpixel-debugge/canpneabbfipaelecfibpmmjbdkiaolf
Optionally, open up Developer Tools to be able to see errors in console if any will happen.
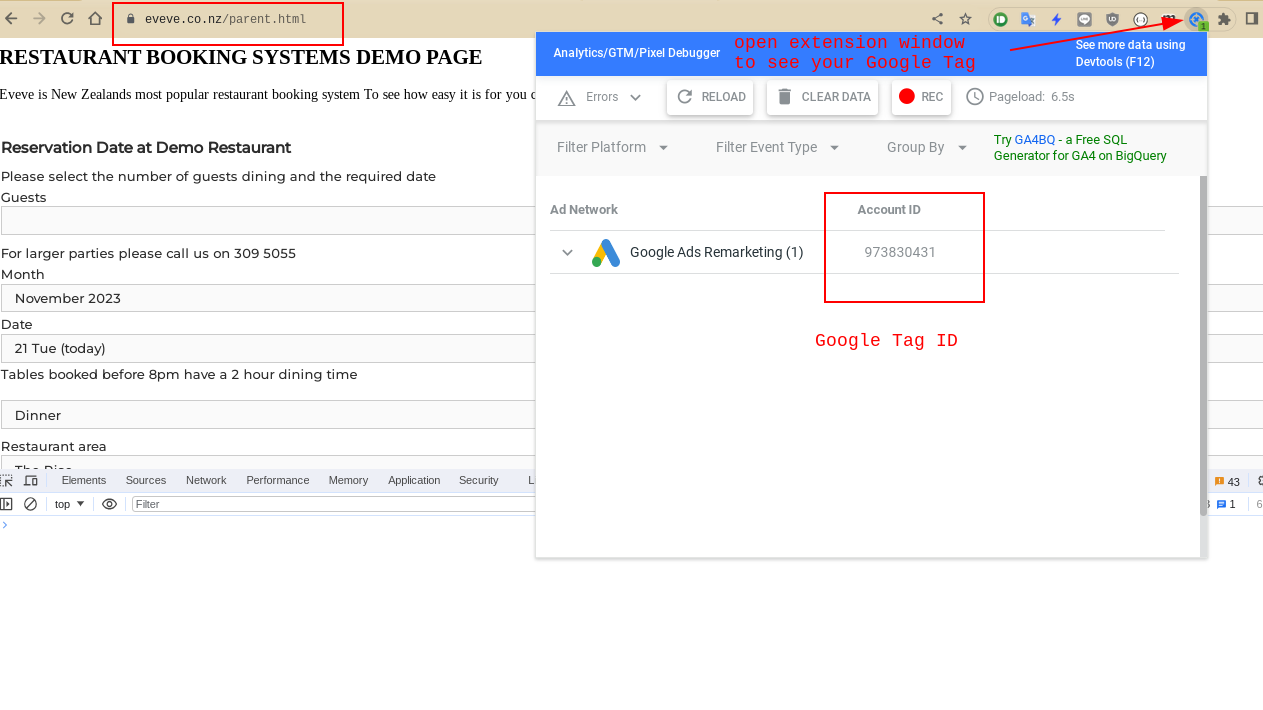
Click on the extension icon to see if your Google Tag works correctly.
It should show your Google Ads account ID, which is also your ConversionID.
Complete test booking to see the confirm page.
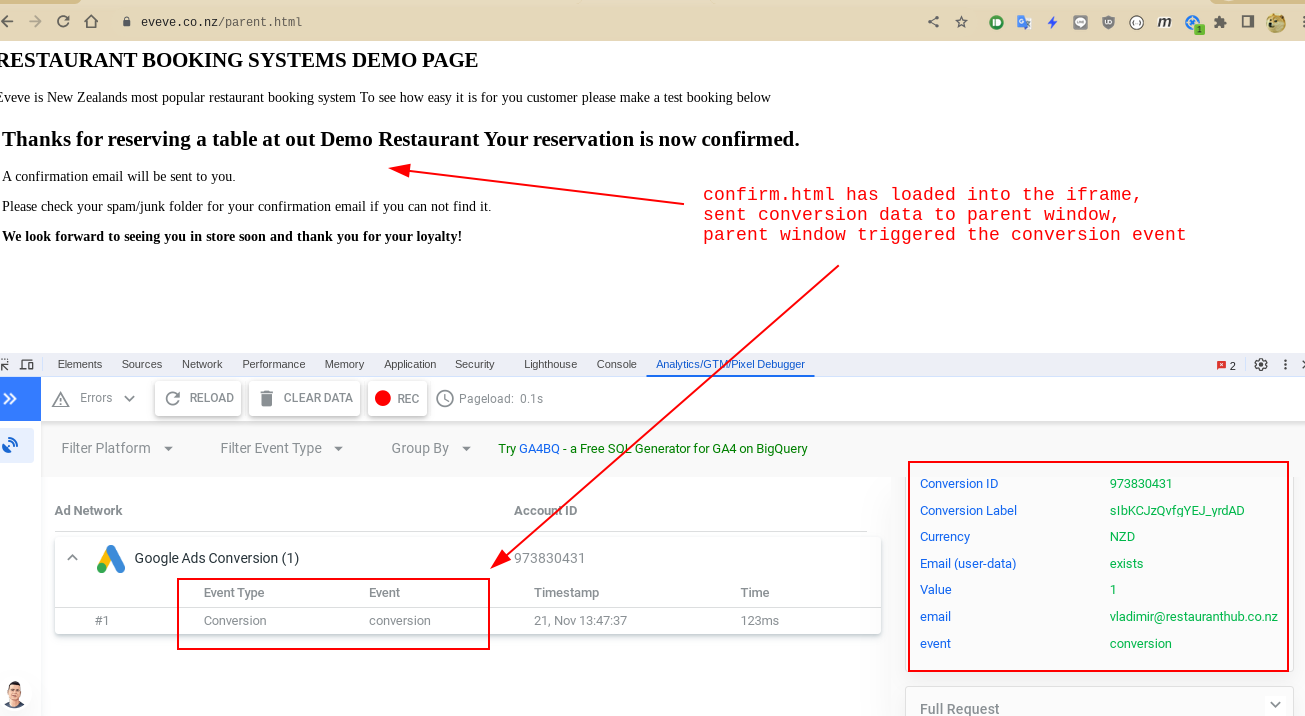
When the confirm page is loaded in iframe you should see a new conversion in the extension window or on developer tools tab.
This conversion event doesn’t count as ‘complete’ on Google Ads portal and not being included into any reports because we skipped the first part where we click
the Sponsored Ad shown in Google search results. This way we only confirm that our script works.
Additionally, when we trigger this conversion action its verification will begin and later you will see that it has a different status ‘No recent conversions’. This status means that conversions can be registered, but none are reported yet.

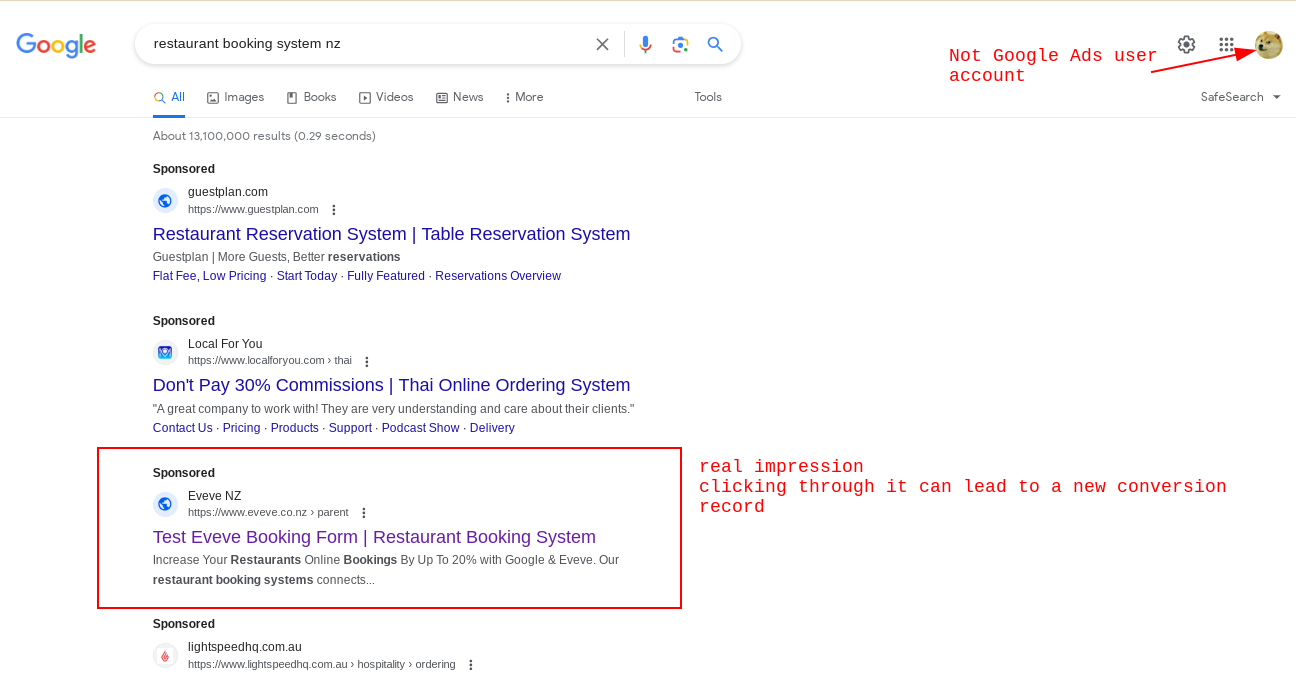
In order to begin receiving real conversions, you need to receive clicks on your Ad from real users.
Important notice
Report data (stats) is not updated instantly. You will start seeing new Impressions, Clicks and Conversions in at least a few minutes after they actually happened. This delay is not constant and may vary depending on your campaign settings and other factors. Read more about it following the link:
https://support.google.com/google-ads/answer/2544985
Another important notice:
When you see your own Ad (as below) it’s not counted as an impression and won’t give you conversion if you try to click-through and complete the conversion goal.
If you want to see how it really looks and test your new conversion, you will have to sign out or switch to another user account.
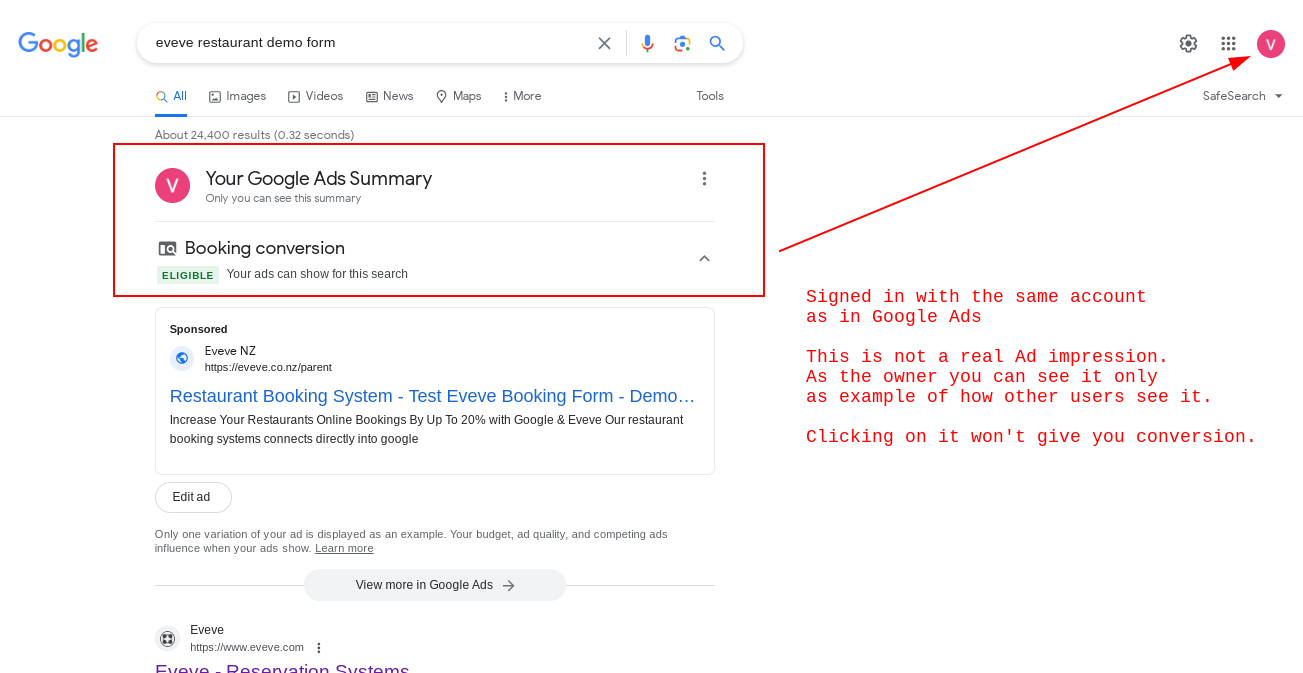
Remember: stats are updated with a delay.
When you complete the full chain of conversion tracking process with a test booking you will be able to see that conversion in at least a few minutes (usually around 15-30 minutes).